Counting Down…

Y’all know Christmas will be here before we know it, right? It’s just over 100 days from now and that will pass in the blink of an eye! I’ve been working on Christmas cards off and on for a couple of weeks now and they’re almost done so I didn’t mind taking a break from them this weekend and working on something else Christmasy. 

A couple of weeks ago, I was talking to some friends and the subject of an advent calendar came up. We concluded that it was either a regional or cultural (based on religion) thing when we were growing up since a couple of us didn’t have them then, but others did. I did them with my kids though so maybe it’s something that became commercialized? I have one that I’ve used for years. It’s a Santa with little pockets for candy or whatever you want to put in them. I’ve been wanting to change it and do something different for several years but haven’t. I have, however, had an idea rolling around in my head for a while and after that conversation the other day, I decided it was time. And this weekend was a perfect opportunity since KB was out of town for a ham radio event.

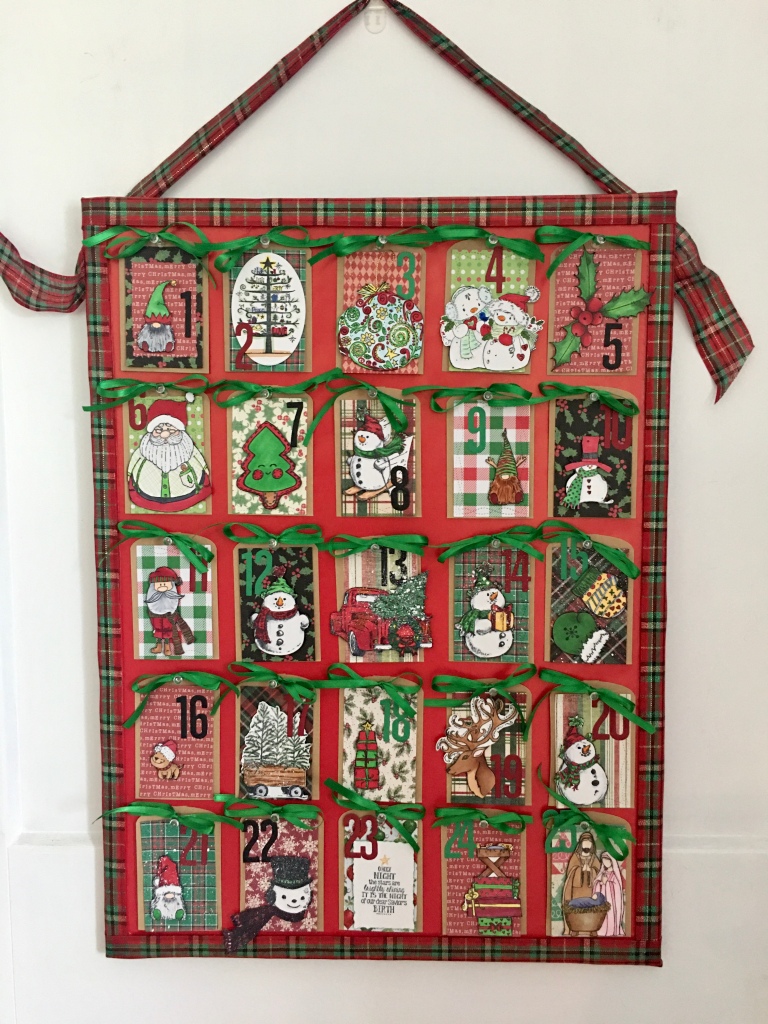
I pulled out all of my Christmas stamps which was many more than I expected since I don’t use but one stamp a year for my cards.  There was a little worry in the back of my mind that I wouldn’t have enough to make 25 different pockets. Ummmm, that was NOT a problem! In fact, I was shocked to discover that I had enough Unity stamps to do the whole thing without duplication. I’ve been a fan of Unity since I discovered them several years ago and have quite a collection started. So, I started stamping them up and then coloring them with my Copic markers. I fussy cut them and mounted them on different Christmas papers along with numbers 1-25. I used small kraft bags from Hobby Lobby as the base for all of them because you know, candy! 

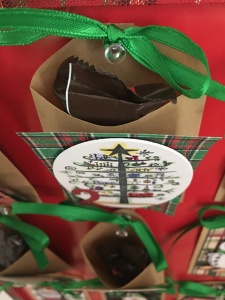
I used a 17 X 23 bulletin board, also from Hobby Lobby, as the foundation. I covered the cork part with red wrapping paper and the frame with plaid Christmas ribbon. I used Scor tape to adhere the wrapping paper and glue dots and score tape for the ribbon. I stapled the ribbon hanger to the back.  Plain old clear push pins with a green ribbon tied into a bow around them hold each bag in place. The bags are big enough for 3-4 Reese’s miniatures or a couple of Snicker’s minis. Or maybe an activity suggestion for the day.  We’ve done that before, too. 

I am so, so happy with the end result. I love it when an idea transfers from my mind to reality so well. It’s a rare thing around here.  Now, I’m all ready for the Countdown to Christmas starting December first!

Christmas was on its way. Lovely, glorious. Beautiful Christmas, upon which the entire kid year revolved. A Christmas Story

Growing in Unity Day 3, By the Sea

I’ve always loved the beach. I love the sound of the waves; it’s such a soothing sound to my soul.  Sunsets and sunrises are always spectacular. I have to admit, I’m much more likely to see the sun set than rise. On the few occasions I do get up early and hit the beach to do a little shelling, that big orange ball cresting over the horizon is an awe-inspiring sight and makes it worth getting up before dawn. 

Three years ago, we moved to the Alabama Gulf Coast and although we don’t live right on the water, we love being near it. One of the first things I did after we moved here was join Share the Beach, an organization that monitors our beaches for nesting sea turtles. Watching those babies come scrambling out of that nest and scampering toward the water is a thrilling sight! When I saw the Speedy set with this cute little guy, I knew I had to have it!

For this card, I used distress oxides to make the underwater background and then stamped and colored the seaweed from the Cuddlebug Sea Horse set.  I colored Speedy with Copics, fussy cut him, and adhered him with foam tape to pop him up a little bit. Then I stamped the sentiment and used some Crystal 3D Lacquer to give some of the bubbles a little dimension.  I used the get well sentiment that is in the Speedy set but I’ve also used this guy for other types of card as well. The card base is an olive green card stock that was in my stash.

Last month, when I saw the Kit of the Month, I couldn’t wait to ink up the shells that are in it and color them. I knew right away that I wanted to put these on a slimline card.  They have become all the rage lately and I’ve gotten on the band wagon. Some stamps just really work on them very well.  I used some of the shells I’ve picked up on the beach as inspiration to color with Copics and added just a bit of Wink of Stella on the inside of them. I made a ‘sandy’ background with distress oxide inks and a wavy stencil and used a slimline stitched die to cut it out. Then, I scattered the shells on it.  It needed a little something else so I added some enamel dots. The card base is made from some turquoise card stock from my stash as was the white to make a thin mat around the card front. 

I hope you enjoyed your ‘beach time’ today. Don’t forget to comment for a chance to win a grab bag of stamps from Unity at the end of the week!

A day at the beach restores the soul.

Growing In Unity, Day 2, Calendar Fun

Welcome to Day 2 of my week of Growing In Unity! Today, I’m putting aside the cards and doing something a little different. I love finding different ways to use my stamps and giving them more versatility. For several years I’ve participated in a calendar swap with a group of crafty friends. We all choose a month and make 12 of the same design. The friend that organizes it collects them all and then puts them in sets and redistributes them to us. The first year we did this, she really had to recruit hard to get enough people to do it but three years later, we have three groups!  

A lot of Unity stamps are the perfect size for the calendars. You can choose any month and almost be assured to find a stamp that would work for it. I am doing two sets of calendars this year and chose to do September and October. For September, I used the mushrooms from Thanks So Mush which is a recent release. I love these mushrooms! They just have so much character. They look great on a slimline card, too! I stamped three of the four mushrooms directly on the piece I’ve cut for the calendar top and then colored them.  I used some paper from my stash to make a mat behind it and adhered it to the calendar with adhesive tape. 

For the October calendar, I chose one of the very first stamps I got from Unity.  I told y’all yesterday that I’m a sucker for old trucks. I love them and use them as often as I can.  This one is Bountiful Haul and is perfect for fall and Thanksgiving with that hay and those pumpkins in the back. I colored this one with Copics but it’s also a great image to do with watercolors.  I matted it with a fall plaid paper from my stash.

Thanks for stopping by today! I hope you enjoyed seeing how I used my stamps on something other than a card. Don’t forget to comment for a chance to win a goody bag from Unity at the end of the week!

Do something creative every day.

Growing In Unity Day 1, A Simple Hello

I am so excited to be the GIU girl this week! It’s such an honor to be able to share some of the things I’ve created with Unity stamps.  I tend to make clean and simple cards although I do love me some mixed media.  My biggest problem this week is deciding which stamps to use and how to use them. There’s so many to choose from and I love them all!! For this card, I used the sets Difficult Roads and Barn Wall.

For my first day, I decided to stick with my clean and simple approach and use one of my favorite stamps.   I started out by stamping the image from the Difficult Roads set and coloring it with Copic markers.  Copics are my preferred coloring medium right now because they are what I’m comfortable with. I do play with watercolors and colored pencils occasionally, but I learned how to color with Copics ages ago and they come easier to me. Anyway, I love this image.  This is such a versatile stamp. I’ve used it on just about every type of card. There are a few things that I am such a sucker for…old cars and trucks, flying pigs, and flowers (and cotton) in a jar. This set was a must have for me.

After I stamped and colored, I fussy cut it and colored the edges with a black brush marker. That’s a little trick I learned right after I started making cards. It gives images a finished look and it helps to hide the jagged little spots where I wasn’t able to cut smoothly.  I knew I wanted to put it on a Kraft card base (I use Kraft bases a lot) and felt like it needed a ‘rustic’ background. I have several things I like to use with this image depending on the purpose of the card.  This time I chose the Barn Wall background stamp; it’s also one of my favorites and I use it a lot. I used black ink and stamped most of it off on another piece of paper before stamping the one I used here. I did this to give it a sort of whitewashed look. I applied Distress Oxide Picket Fences ink to wash it out a little more. I used a die to cut the word hello from Kraft paper and then glued it down. Foam tape as the adhesive popped the jar up a bit and gives it a little dimension.  Now I have a simple and cute card ready to be used. 

Tomorrow I’ll be using a newer stamp and another old favorite on something other than a card so come by and check it out. Thanks for looking at my card today and be sure to comment for a chance to win a grab bag of Unity stamps at the end of the week!

Crafting makes everything better…even Mondays!

Supercalifragilistic

I hate cancer. I’m pretty sure I don’t need to tell anyone that. I mean, who doesn’t hate cancer? Even Mary Poppins, the effervescent, eternally positive nanny, hates cancer. At least in my world she does. Several years ago, I saw this stamp from Cas-ual Fridays and just had to have it. It’s now discontinued so I’m really glad I got it when I did.

I had a friend going through chemo at the time and it was a perfect sentiment for her. I have had to use it several times since then and while I do like it, I hate the reason for it even having a purpose.

Unfortunately, I had the occasion to bring it out and ink it up again recently. A family member was diagnosed with breast cancer and I wanted to send her a card that would not only let her know I was thinking about her but that might make her smile. Laughter really is good medicine and attitude is so important when fighting for your life. Staying positive and strong can make a huge difference in how well and how quickly you come through something like this.

A few months ago, I stumbled across this Nanny Poppins digital stamp on Etsy. I immediately snapped it up and put it in my arsenal for future use. When it came time to make this card, knew I had to use her. I printed her up, colored her, and cut her out for the front of the card. She most definitely needed to go onto a pink background since pink is the color for breast cancer awareness and support. For this card, I used a pink paper I had in my stash but I have used distress inks to make my own background in the past. I also used pink ink for the sentiment on the inside. I drew a slashed line with a black marker to give her the illusion of flying. Then, I glued the card front on a matching blue base and I was done. Next time, I’m going to put a white mat between the front and base to enhance it a little more. Overall, I’m pretty happy with this card but wish I would never have to use it again.

And my family member that the card is for? They caught her cancer very early and although she is going to have to undergo radiation treatment, her prognosis is very good.

“Live each day as if your life had just begun.” – Johann Wolfgang Von Goethe

Fun Summer Cards

I’ve decided it’s time to document some of my crafty endeavors and I’m starting with these cute summer themed cards. I stamped and colored these little critters a while back but wasn’t sure what I was going to do with them until this week.  Sometimes things have to sit and percolate in my brain for a while before it all comes together.

I used three different stamp sets for these cards; two from Neat and Tangled (both, unfortunately, are discontinued), and one from Gerda Steiner Designs (Pool Piggies).  They work so well together it’s hard to believe they aren’t all from the same set! I started by making the background on an 8 ½ X 11 piece of cardstock with distress oxide inks to give a water feel to it.   I then cut it into three pieces, two 3 ½ by 8 ½  and one 4 ½ by 8 ½. I then cut the larger piece in half. 

I used a Sizzix deckle die to cut the word collage and then colored the edge with distress oxide ink.  I arranged the images and adhered them to the base. I used foam tape on some of them to give them some dimension. Lime green card stock as a card base kept the summery feel going.  I decided that I wanted to try my hand at a little envelope art with this one. I drew a beach and added a stamped image of a beach umbrella and a few little birds and then water colored them.

For the second card, I cut a sand strip from printed paper and then adhered the stamped images. I used a die to cut the word SUMMER from white card stock four times and then layered them to give dimension to the word.  I used a white card base for this one but it was a bit stark so I used some ink to add just a little color around the edge to soften it.

The last two cards just used the images I had left over and A2 kraft card bases. Now, I have four cute cards to brighten someone’s mailbox!

Time you enjoy wasting is not wasted time… John Lennon

Calendar Girls…January, Take Three

Several years ago, I started making calendars with a group of crafty ladies. I tell how it all came about here. Last year (2019) there were two groups of ladies making calendars and this year we had three! This year, I participated in two of the groups (and wish I had done all three!) and gave one as a gift. January was my month for the first group and I chose this little gnome from Picket Fence Studios to adorn my calendar. He was so much fun to color and made me fall in love with gnomes. I now have several different ones and plan to use them throughout the year, not just during Christmas and winter. I used a snowflake embossing folder on the background-I have no idea where I got it.  I just love seeing this on my kitchen counter every day…he makes me smile!IMG_0820