Purple Gator

Every once in a while, I see a stamp that really appeals to me and I KNOW exactly how I want to use it. This alligator from Trinity Stamp Company is one of those stamps. It’s a 4 X 8 set called Oh, Snap and has so many possibilities. Me, I saw a Mardi Gras partying gator!

Purple, green, and gold are the main colors universally associated with Mardi Gras and I wanted to make him a little different than your typical alligator so I colored him purple with my Copic markers. (Aside here…I really wish that Copic could come up with more/better purple colors!) I had a picture in my head-sort of- of what I wanted the background to look like and although I played with distress oxide ink sprays and pads I just wasn’t satisfied with anything I came up with. I have a pretty healthy paper stash and am pretty sure I have some Mardi Gras paper but couldn’t find it. That’s okay because it made me have to go another route and I am SO happy with the end result.

As I was going to sleep the other night, I had an idea of how to make the background I saw in my head with my Gelli plate. Thank goodness I remembered that idea the next morning! So often those thoughts drift away with my dreams. I got my plate, some paint, and stencils out and went to town playing with combinations. I ended up with lots of cool prints I’ll be using in the future but as soon as I picked this one up, I knew it was the one! I used the Tim Holtz Harlequin stencil and gold paint for the design and then purple and green as the background. The inside sentiment was done on my computer and printed on card stock.

I’m not completely happy with the ‘beads’ (I may end up removing them!) and the gold crown sort of disappears into the background but overall, this card turned out pretty much as I had envisioned it. That really doesn’t happen very often for me so I’m very happy with this one!

Laissez Les Bon Temps Rouler

5, 6, 7, 8…Celebrate!

When I was a little girl, I took dance classes; ballet, tap, and jazz. I loved it although I was never very good at it. Tap and jazz were more my thing than ballet was but I think it was because I liked the music better. However, I have no rhythm and struggled with the dances. My last class was when I was about 12 years old.

Last year, for their one of their Stamptember stamps, Simon Says Stamps collaborated with Colorado Craft Company and had this stamp set. I LOVED it immediately and had to have it. This was my first exposure to CCC and oh.my.word. I’ve loved everything they’ve put out since. Actually, I love everything of theirs before and after I discovered them.

As is the case with more stamps than I’d like to admit, this one sat on my shelf until the other day when I was looking for something to make a birthday card for one of my besties. Like me, she took dance classes as a kid but she stayed with it a lot longer than I did. In fact, she was taking tap lessons just last year (I was so jealous, I think this would be SO much fun!). Anyway, when I saw this set, I knew exactly what I wanted to do.

I stamped just the dancer on the left…the tap dancer… and colored her up. I fussy cut her so that I could put her on the black and white harlequin background from Amuse Studios. And let me tell you, if you knew my friend, you’d know that this background is perfect for her. I wanted to bring the pink of the tutu skirt out so I decided to use a pink card base and stamp the sentiment on pink as well. This pink card stock is a little smooth with a bit of texture so I did emboss the sentiment to make sure it wasn’t going to smear. I cut it with a die I like (I don’t know the brand or even where I got it). I used foam tape as my adhesive for the dancer and scor tape for the sentiment. On the inside it says “Celebrate”.

I think she’ll like her card this year and although she’s celebrating a ‘mature’ birthday, I think this card and this whole set would be perfect for dancers of all ages!

When you dance, your purpose is not to get to a certain place on the floor, it’s to enjoy each step along the way…Wayne Dyer

Autumn Pumpkins and Leaves…Growing in Unity Blog Hop

I’m so excited to be a part of the Growing in Unity blog hop! It’s been a while since I was able to get into my craft room due to Hurricane Sally and it felt so good to sit at that table and get creative. 

I have two autumn cards to share today. Autumn is my favorite season so it’s really a lot of fun to make cards with these fall colors and things like pumpkins and leaves. The first card uses the Pumpkin Patch border background on kraft cardstock. I stamped part of the stamp using one end and then used watercolors to color it. In recent years, the different colored pumpkins have become very popular and I love them so I brought in some non-traditional colors here. The sentiment is from the September 2019 Sentiment Kit, …change can be beautiful.  I hate to admit it, but I haven’t inked that kit up until now and oh.my.goodness. there is so many great things in it! I can’t wait to play with it more. I had the autumn plaid in my stash and put it on the blue card base at an angle so the plaid would show. I wrapped jute around the kraft cover and tied the bow and then glued it to the base. I felt like it was missing a little something so I added the enamel dots…jury is still out on those though. 

As mentioned above, I love the colors of autumn. One of the things I really miss living here on the Gulf Coast is the colors of the leaves changing. There’s not a lot of trees here that change colors, at least not like they do in other parts of the country, especially the mountains. However, we do have beautiful flowers pretty much year-round so I can’t complain about not having color!

My second card is a slimline card using the beautiful colors of fall and one of my favorite quotes about autumn.  The leaves are from the August 2019 Kit of the Month (another awesome kit FULL of great stamps!). I stamped them and colored them with copics and fussy cut them. The quote is from the same kit and I stamped it on beige card stock and cut it out with a deckle die. I used brown ink to ‘distress’ the edges to give it a more rustic look. I’m a kraft-a-holic and use kraft paper as much or more than I do white so my base is kraft cardstock. I have a ton of this plaid paper left from a project I did last year and it made a great background for the burlap ribbon. I glued it all down and there you have it. I’m way behind on sending cards and these two will help get me back on track. 

Thanks for stopping by and I hope you’ll come back. The next stop on the hop is:

https://thewashihorse.blogspot.com

Here’s the full official hopping order: 

 https://inkstainswithroni.blogspot.com/…/growing-in…

 www.htbcreations.com

 https://gatheringgoatfeathers.wordpress.com (you are here)

https://thewashihorse.blogspot.com

Thank you Unity for including me in this hop! It’s been so much fun being a Growing In Unity girl this year. 

“I am so glad I live in world where there are Octobers.” L.M. Montgomery, Anne of Green Gables

Fall Trees

I love autumn…the crisp morning temperatures, the return of football, caramel apples, and pumpkin everything. Scarecrows and hay bales, sweaters and boots. One of my favorite things is watching the leaves turn fabulous shades of orange, yellow, and red. I’m not a fan of raking them when they fall, though. When the sun hits them, they have this amazing glow to them and are just gorgeous. 

Seasonal cards are fun for a general card like hello or thinking of you. I made these a while back using autumn colors for the trees. These stamps are versatile in that you could use them for any season by changing the colors you use for the leaves. I used an autumn plaid paper that I’ve had for a while as a background mat. 

These trees are a stamp from MFT (My Favorite Things) named Modern Trees. I’ve had it a few years and have used it a lot for autumn cards as well as sympathy cards. I used colored Momento inks to stamp it on a beige cardstock. The card base is a cranberry color that I had in my stash. 

This tree blowing in the wind is Blowing Tree by Crackerbox and Suzy. It’s one of four in a series of seasonal trees and all four are great. I stamped it in brown Momento Ink on beige cardstock and colored the leaves with Copic markers. The base is your basic Kraft cardstock. 

I love it when I can use things I like in my card making like these fall trees. I’m not sure who I’ll send them to or what sentiment I might add to them, but they’re ready to be finished up when I need them. 

Autumn is a second spring when every leaf is a flower.  Albert Camus

Sunflowers and Apples Gnome

I haven’t been able to get into my craft room for a couple of weeks now because of Hurricane Sally and the aftermath of cleaning up. But, I have a few things that I got done right before she decided to make her appearance and I thought I’d share them this week.

With their little pointed hats, hidden eyes, and whimsical beards or braids, they are charming and mischievous at the same time. But no where are they as popular as in the stamping world right now.  Almost every company has at least one set of some sort of gnome. And I love (and want!) them all. 

Gnomes are a big thing right now. Use to be that you saw them only at Christmas but not any more. Now you see them everywhere. There is a commercial on tv with a little ‘travel’ gnome as it’s spokesperson. Sports teams have decked them out in the team colors for fans everywhere to show their allegiance. And you might see a little garden gnome hiding in someone’s yard every once in a while.  

I stumbled upon this cute little Autumn Gnome digital from KLM Designs by accident but as soon as I saw him, I knew I had to have him! That sunflower and those apples spoke to me. I colored him up and cut him out and adhered him to some golden yellow card stock that I had lightly stamped some sunflowers on.  The mat is some fall plaid paper that I’ve had for several years. Normally, I would go with a kraft card base but when I tried it, it sort of dulled the colors so I decided to go with a red card base to keep the colors brighter. 

He’ll be going out later this week to cheer up someone’s mailbox just because. 

Growing In Unity, Day 4- For the Guys

Am I the only person that struggles with ideas for guy cards? It comes much easier to me to make girl cards than it does guy cards. Thankfully, Unity has some great stamps that make guy cards easier! Today, I’m going to be using two of them to make a couple of birthday cards. 

The first card today uses my absolute favorite stamp from Unity. It’s the first stamp I ever bought from them and I have probably used it more than any other. This truck from Slowly Turning Classic is just awesome. It’s fun to color and works for guys of all ages. I used it for my nephew for his 16th birthday (and getting his drivers license) as well as for my uncle’s 70th birthday. To make this card, I stamped the truck directly on the card front and colored it with Copics. You’ve probably figured out by now that they are my favorite coloring medium. I wanted to put a background around the truck so I created a mask for it. I did this by stamping and cutting out the truck from a piece of card stock and put it on top of the stamped image. Then, I took the Barn Wall background (I told you that you’d see it again this week!) and stamped it with brown ink. I used distress oxide ink to ‘dirty’ the wall and edges a little.  Then, I stamped the sentiment directly on the card front. I put the card front on the red card base which I made from card stock in my stash. 

For the second card today, I used the Scout Adventures stamp set. We lived in Colorado for 10 years and miss those mountains. I knew this stamp would make a perfect card for him as well as some other guys I know.  The Jeep is stamped on white card stock and colored with Copics. The sentiment is stamped on white cardstock and I tore the edges to give it that ragged look. I used brown ink on the edges and distress oxide ink to dirty it up. For this card, I decided to make my own background instead of using a stamp and used distress oxide inks to color it. I made the trees using a stencil and drew the mountains free hand. The Jeep is popped up with foam tape and the sentiment is glued down. I went with my favorite, a Kraft base to compliment the rugged look of the card. This was my husband’s Father’s Day card and of all the cards I’ve made for him, this is the one he’s kept on his dresser. 

Hopefully you don’t struggle as much as I do to make guy cards but maybe this will give you a little inspiration if you do. Don’t forget to comment for the chance to win a Unity grab bag at the end of the week!

A good guy is like a four leaf clover, lucky to have and hard to find.

Growing in Unity Day 3, By the Sea

I’ve always loved the beach. I love the sound of the waves; it’s such a soothing sound to my soul.  Sunsets and sunrises are always spectacular. I have to admit, I’m much more likely to see the sun set than rise. On the few occasions I do get up early and hit the beach to do a little shelling, that big orange ball cresting over the horizon is an awe-inspiring sight and makes it worth getting up before dawn. 

Three years ago, we moved to the Alabama Gulf Coast and although we don’t live right on the water, we love being near it. One of the first things I did after we moved here was join Share the Beach, an organization that monitors our beaches for nesting sea turtles. Watching those babies come scrambling out of that nest and scampering toward the water is a thrilling sight! When I saw the Speedy set with this cute little guy, I knew I had to have it!

For this card, I used distress oxides to make the underwater background and then stamped and colored the seaweed from the Cuddlebug Sea Horse set.  I colored Speedy with Copics, fussy cut him, and adhered him with foam tape to pop him up a little bit. Then I stamped the sentiment and used some Crystal 3D Lacquer to give some of the bubbles a little dimension.  I used the get well sentiment that is in the Speedy set but I’ve also used this guy for other types of card as well. The card base is an olive green card stock that was in my stash.

Last month, when I saw the Kit of the Month, I couldn’t wait to ink up the shells that are in it and color them. I knew right away that I wanted to put these on a slimline card.  They have become all the rage lately and I’ve gotten on the band wagon. Some stamps just really work on them very well.  I used some of the shells I’ve picked up on the beach as inspiration to color with Copics and added just a bit of Wink of Stella on the inside of them. I made a ‘sandy’ background with distress oxide inks and a wavy stencil and used a slimline stitched die to cut it out. Then, I scattered the shells on it.  It needed a little something else so I added some enamel dots. The card base is made from some turquoise card stock from my stash as was the white to make a thin mat around the card front. 

I hope you enjoyed your ‘beach time’ today. Don’t forget to comment for a chance to win a grab bag of stamps from Unity at the end of the week!

A day at the beach restores the soul.

Growing In Unity Day 1, A Simple Hello

I am so excited to be the GIU girl this week! It’s such an honor to be able to share some of the things I’ve created with Unity stamps.  I tend to make clean and simple cards although I do love me some mixed media.  My biggest problem this week is deciding which stamps to use and how to use them. There’s so many to choose from and I love them all!! For this card, I used the sets Difficult Roads and Barn Wall.

For my first day, I decided to stick with my clean and simple approach and use one of my favorite stamps.   I started out by stamping the image from the Difficult Roads set and coloring it with Copic markers.  Copics are my preferred coloring medium right now because they are what I’m comfortable with. I do play with watercolors and colored pencils occasionally, but I learned how to color with Copics ages ago and they come easier to me. Anyway, I love this image.  This is such a versatile stamp. I’ve used it on just about every type of card. There are a few things that I am such a sucker for…old cars and trucks, flying pigs, and flowers (and cotton) in a jar. This set was a must have for me.

After I stamped and colored, I fussy cut it and colored the edges with a black brush marker. That’s a little trick I learned right after I started making cards. It gives images a finished look and it helps to hide the jagged little spots where I wasn’t able to cut smoothly.  I knew I wanted to put it on a Kraft card base (I use Kraft bases a lot) and felt like it needed a ‘rustic’ background. I have several things I like to use with this image depending on the purpose of the card.  This time I chose the Barn Wall background stamp; it’s also one of my favorites and I use it a lot. I used black ink and stamped most of it off on another piece of paper before stamping the one I used here. I did this to give it a sort of whitewashed look. I applied Distress Oxide Picket Fences ink to wash it out a little more. I used a die to cut the word hello from Kraft paper and then glued it down. Foam tape as the adhesive popped the jar up a bit and gives it a little dimension.  Now I have a simple and cute card ready to be used. 

Tomorrow I’ll be using a newer stamp and another old favorite on something other than a card so come by and check it out. Thanks for looking at my card today and be sure to comment for a chance to win a grab bag of Unity stamps at the end of the week!

Crafting makes everything better…even Mondays!

How I Got Into Making Cards

I have always loved to create. From the time I was a little girl, I’ve always had some creative hobby. Usually more than one at a time. But, for the last several years, I’ve had one hobby that has consumed me and every spare minute I can manufacture.

I fell into the rabbit hole of card making about three years ago. I attended a scrapbook retreat and participated in something called a shoebox card swap.  Even though I wasn’t a card maker and hadn’t planned to be a part of it, all of the people participating had made extra card kits so I was invited to play along.  To be honest, I really just did it because the cards were all so pretty and I was going to walk out of there with a bunch of cards that looked great and were easy to put together. It was not something I intended to ever do again after the retreat because I had tried stamping years ago and didn’t really enjoy it. Mostly because it was very frustrating to me and I wasn’t good at it. I could never get a clear image stamped. It was virtually impossible to get enough ink on a stamp to where I could only stamp it once and it be good enough to use. I would then have to re-stamp it and to be able to line it up perfectly a second time…well, it just wouldn’t happen for me.  But this time, there was something new in the mix. It’s called a MISTI.

The MISTI is a stamping platform that allows you to position your stamp and paper so that you can stamp the image over and over until you’ve gotten the complete image you want. Complete and total game changer for someone like me that had always struggled with this issue! It didn’t take me long to know that I had found a new craft and I was in trouble. LOL I jumped in with both feet and started to swim like crazy.

Card making has released a creativity in me that I honestly didn’t know I had. It has made me so much more aware of color and composition and how to create and balance them. It has led me to try things I never had the confidence to try before.  Watercolors, ink blending, art journaling, mixed media…these are just a few of the things I’ve discovered in the last few years. 

One of the biggest things it’s done for me, confidence wise, is being willing to share what I make. I actually send the cards I make to people! And I will share them on social media and in card making groups where some of the people there are AMAZING artists. But, one of the things I’ve also discovered about this community is that everyone is so encouraging and helpful. No matter how bad what you’ve made is, they are right there to give you advice on how to improve it and words to encourage and uplift you without being critical. There is always someone there to answer your questions and never make you feel stupid for asking something that has been asked a dozen times.

I will say this…it makes me happy and relaxes me to get in my little closet and play with stamps and ink, paper and markers, and paints and brushes. I make things I like. I make things that make me happy and, hopefully, when they land in someone else’s hands, make them smile. My goal is, and always will be, to bring a little sunshine to someone’s mail box.  Learning some art skills and discovering new techniques and mediums along the way is a bonus.  

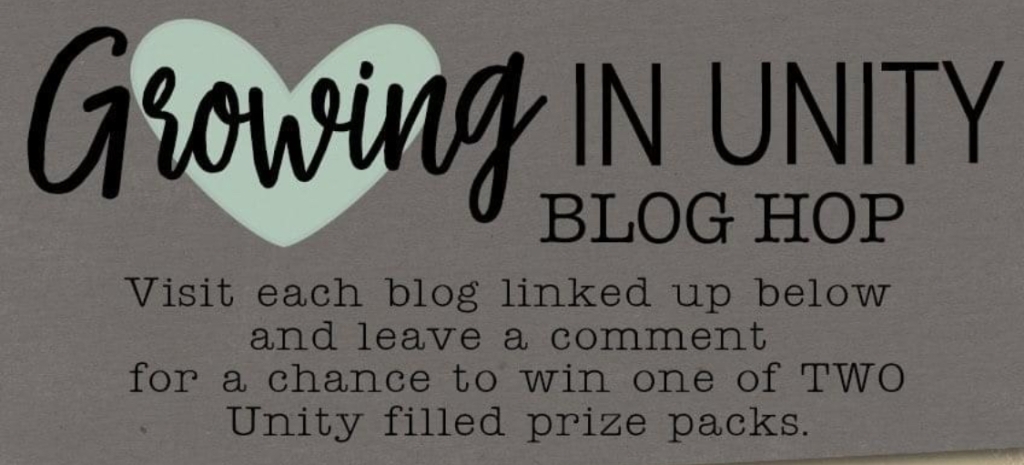
This week, starting Monday, I will be really stepping out of my comfort zone by being a Growing In Unity (GIU) girl. Unity Stamp Company is one of my absolute favorite stamp companies. They have a wonderful program where you put your name in and they randomly draw out names-one for every week of the year-and then invite those drawn to showcase your creations for a week.  I entered last year and was so excited to have my name drawn. My week is next week-August 10-15. I’m so excited but also nervous. I know I’ve come a long way since I first started making cards but I’m no where near where I want to be.  I feel that it is truly an honor to be a GIU girl and I hope I can do their stamps justice. So, if you’re interested in seeing some awesome stamps or what I’ve made with them, check in every day this week and have a look! 

The desire to create is one of the deepest yearnings of the human soul.  Elder Uchtdorf