Autumn Pumpkins and Leaves…Growing in Unity Blog Hop

I’m so excited to be a part of the Growing in Unity blog hop! It’s been a while since I was able to get into my craft room due to Hurricane Sally and it felt so good to sit at that table and get creative. 

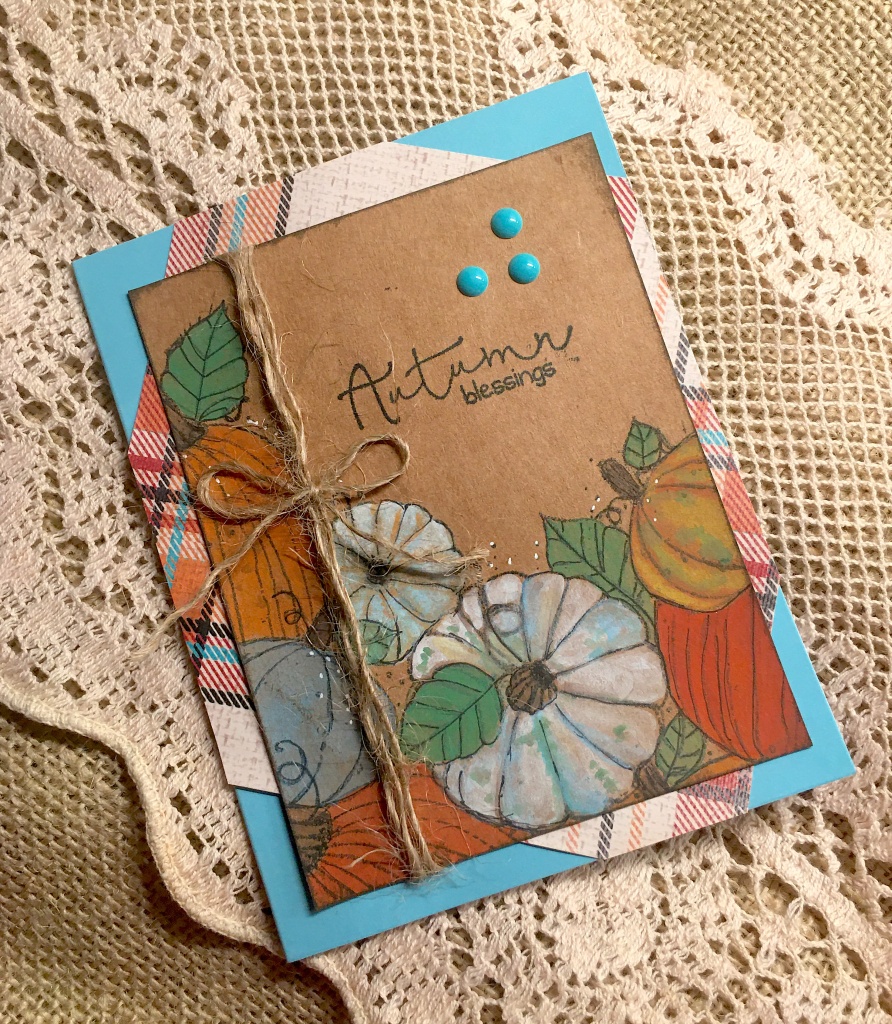
I have two autumn cards to share today. Autumn is my favorite season so it’s really a lot of fun to make cards with these fall colors and things like pumpkins and leaves. The first card uses the Pumpkin Patch border background on kraft cardstock. I stamped part of the stamp using one end and then used watercolors to color it. In recent years, the different colored pumpkins have become very popular and I love them so I brought in some non-traditional colors here. The sentiment is from the September 2019 Sentiment Kit, …change can be beautiful.  I hate to admit it, but I haven’t inked that kit up until now and oh.my.goodness. there is so many great things in it! I can’t wait to play with it more. I had the autumn plaid in my stash and put it on the blue card base at an angle so the plaid would show. I wrapped jute around the kraft cover and tied the bow and then glued it to the base. I felt like it was missing a little something so I added the enamel dots…jury is still out on those though. 

As mentioned above, I love the colors of autumn. One of the things I really miss living here on the Gulf Coast is the colors of the leaves changing. There’s not a lot of trees here that change colors, at least not like they do in other parts of the country, especially the mountains. However, we do have beautiful flowers pretty much year-round so I can’t complain about not having color!

My second card is a slimline card using the beautiful colors of fall and one of my favorite quotes about autumn.  The leaves are from the August 2019 Kit of the Month (another awesome kit FULL of great stamps!). I stamped them and colored them with copics and fussy cut them. The quote is from the same kit and I stamped it on beige card stock and cut it out with a deckle die. I used brown ink to ‘distress’ the edges to give it a more rustic look. I’m a kraft-a-holic and use kraft paper as much or more than I do white so my base is kraft cardstock. I have a ton of this plaid paper left from a project I did last year and it made a great background for the burlap ribbon. I glued it all down and there you have it. I’m way behind on sending cards and these two will help get me back on track. 

Thanks for stopping by and I hope you’ll come back. The next stop on the hop is:

https://thewashihorse.blogspot.com

Here’s the full official hopping order: 

 https://inkstainswithroni.blogspot.com/…/growing-in…

 www.htbcreations.com

 https://gatheringgoatfeathers.wordpress.com (you are here)

https://thewashihorse.blogspot.com

Thank you Unity for including me in this hop! It’s been so much fun being a Growing In Unity girl this year. 

“I am so glad I live in world where there are Octobers.” L.M. Montgomery, Anne of Green Gables

Calendar Catch Up…July and August

Today I’m going to finish getting my calendars caught up! But first, I want to announce the winners from my Growing In Unity Week. They are Nikki Kittrell and Amy Williams. Congratulations!! They are the lucky winners of a grab bag of 25 Unity stamps for commenting on my posts last week.

Now, for the calendars…July was done by one of my dearest friends and just happens to be the one that organizes the calendar swap. It is a fabulous celebration of the holiday that July is known for…the 4th of July! Don’t you love that skyline and those fireworks?!

For August, it’s a simple topper with a quote that really spoke to me. “Set sail in the direction of your dreams”. I’m working chasing some dreams this year and I just love that quote! It was very timely for me. A friend in Boston made this one and one of the things that is so amazing to me about it? She underwent a heart transplant two years ago and has faced a lot of challenges and issues due to it in the time since. Yet, she managed to participate in the exchange last year and did an marvelous job!

Although each month is unique and the styles and techniques are different, I love every one of the pages. They make me smile and think of the person that made them every time I see them.

Time moves slowly but passes quickly

Growing In Unity, Day 4- For the Guys

Am I the only person that struggles with ideas for guy cards? It comes much easier to me to make girl cards than it does guy cards. Thankfully, Unity has some great stamps that make guy cards easier! Today, I’m going to be using two of them to make a couple of birthday cards. 

The first card today uses my absolute favorite stamp from Unity. It’s the first stamp I ever bought from them and I have probably used it more than any other. This truck from Slowly Turning Classic is just awesome. It’s fun to color and works for guys of all ages. I used it for my nephew for his 16th birthday (and getting his drivers license) as well as for my uncle’s 70th birthday. To make this card, I stamped the truck directly on the card front and colored it with Copics. You’ve probably figured out by now that they are my favorite coloring medium. I wanted to put a background around the truck so I created a mask for it. I did this by stamping and cutting out the truck from a piece of card stock and put it on top of the stamped image. Then, I took the Barn Wall background (I told you that you’d see it again this week!) and stamped it with brown ink. I used distress oxide ink to ‘dirty’ the wall and edges a little.  Then, I stamped the sentiment directly on the card front. I put the card front on the red card base which I made from card stock in my stash. 

For the second card today, I used the Scout Adventures stamp set. We lived in Colorado for 10 years and miss those mountains. I knew this stamp would make a perfect card for him as well as some other guys I know.  The Jeep is stamped on white card stock and colored with Copics. The sentiment is stamped on white cardstock and I tore the edges to give it that ragged look. I used brown ink on the edges and distress oxide ink to dirty it up. For this card, I decided to make my own background instead of using a stamp and used distress oxide inks to color it. I made the trees using a stencil and drew the mountains free hand. The Jeep is popped up with foam tape and the sentiment is glued down. I went with my favorite, a Kraft base to compliment the rugged look of the card. This was my husband’s Father’s Day card and of all the cards I’ve made for him, this is the one he’s kept on his dresser. 

Hopefully you don’t struggle as much as I do to make guy cards but maybe this will give you a little inspiration if you do. Don’t forget to comment for the chance to win a Unity grab bag at the end of the week!

A good guy is like a four leaf clover, lucky to have and hard to find.

Growing in Unity Day 3, By the Sea

I’ve always loved the beach. I love the sound of the waves; it’s such a soothing sound to my soul.  Sunsets and sunrises are always spectacular. I have to admit, I’m much more likely to see the sun set than rise. On the few occasions I do get up early and hit the beach to do a little shelling, that big orange ball cresting over the horizon is an awe-inspiring sight and makes it worth getting up before dawn. 

Three years ago, we moved to the Alabama Gulf Coast and although we don’t live right on the water, we love being near it. One of the first things I did after we moved here was join Share the Beach, an organization that monitors our beaches for nesting sea turtles. Watching those babies come scrambling out of that nest and scampering toward the water is a thrilling sight! When I saw the Speedy set with this cute little guy, I knew I had to have it!

For this card, I used distress oxides to make the underwater background and then stamped and colored the seaweed from the Cuddlebug Sea Horse set.  I colored Speedy with Copics, fussy cut him, and adhered him with foam tape to pop him up a little bit. Then I stamped the sentiment and used some Crystal 3D Lacquer to give some of the bubbles a little dimension.  I used the get well sentiment that is in the Speedy set but I’ve also used this guy for other types of card as well. The card base is an olive green card stock that was in my stash.

Last month, when I saw the Kit of the Month, I couldn’t wait to ink up the shells that are in it and color them. I knew right away that I wanted to put these on a slimline card.  They have become all the rage lately and I’ve gotten on the band wagon. Some stamps just really work on them very well.  I used some of the shells I’ve picked up on the beach as inspiration to color with Copics and added just a bit of Wink of Stella on the inside of them. I made a ‘sandy’ background with distress oxide inks and a wavy stencil and used a slimline stitched die to cut it out. Then, I scattered the shells on it.  It needed a little something else so I added some enamel dots. The card base is made from some turquoise card stock from my stash as was the white to make a thin mat around the card front. 

I hope you enjoyed your ‘beach time’ today. Don’t forget to comment for a chance to win a grab bag of stamps from Unity at the end of the week!

A day at the beach restores the soul.

Growing In Unity, Day 2, Calendar Fun

Welcome to Day 2 of my week of Growing In Unity! Today, I’m putting aside the cards and doing something a little different. I love finding different ways to use my stamps and giving them more versatility. For several years I’ve participated in a calendar swap with a group of crafty friends. We all choose a month and make 12 of the same design. The friend that organizes it collects them all and then puts them in sets and redistributes them to us. The first year we did this, she really had to recruit hard to get enough people to do it but three years later, we have three groups!  

A lot of Unity stamps are the perfect size for the calendars. You can choose any month and almost be assured to find a stamp that would work for it. I am doing two sets of calendars this year and chose to do September and October. For September, I used the mushrooms from Thanks So Mush which is a recent release. I love these mushrooms! They just have so much character. They look great on a slimline card, too! I stamped three of the four mushrooms directly on the piece I’ve cut for the calendar top and then colored them.  I used some paper from my stash to make a mat behind it and adhered it to the calendar with adhesive tape. 

For the October calendar, I chose one of the very first stamps I got from Unity.  I told y’all yesterday that I’m a sucker for old trucks. I love them and use them as often as I can.  This one is Bountiful Haul and is perfect for fall and Thanksgiving with that hay and those pumpkins in the back. I colored this one with Copics but it’s also a great image to do with watercolors.  I matted it with a fall plaid paper from my stash.

Thanks for stopping by today! I hope you enjoyed seeing how I used my stamps on something other than a card. Don’t forget to comment for a chance to win a goody bag from Unity at the end of the week!

Do something creative every day.

Growing In Unity Day 1, A Simple Hello

I am so excited to be the GIU girl this week! It’s such an honor to be able to share some of the things I’ve created with Unity stamps.  I tend to make clean and simple cards although I do love me some mixed media.  My biggest problem this week is deciding which stamps to use and how to use them. There’s so many to choose from and I love them all!! For this card, I used the sets Difficult Roads and Barn Wall.

For my first day, I decided to stick with my clean and simple approach and use one of my favorite stamps.   I started out by stamping the image from the Difficult Roads set and coloring it with Copic markers.  Copics are my preferred coloring medium right now because they are what I’m comfortable with. I do play with watercolors and colored pencils occasionally, but I learned how to color with Copics ages ago and they come easier to me. Anyway, I love this image.  This is such a versatile stamp. I’ve used it on just about every type of card. There are a few things that I am such a sucker for…old cars and trucks, flying pigs, and flowers (and cotton) in a jar. This set was a must have for me.

After I stamped and colored, I fussy cut it and colored the edges with a black brush marker. That’s a little trick I learned right after I started making cards. It gives images a finished look and it helps to hide the jagged little spots where I wasn’t able to cut smoothly.  I knew I wanted to put it on a Kraft card base (I use Kraft bases a lot) and felt like it needed a ‘rustic’ background. I have several things I like to use with this image depending on the purpose of the card.  This time I chose the Barn Wall background stamp; it’s also one of my favorites and I use it a lot. I used black ink and stamped most of it off on another piece of paper before stamping the one I used here. I did this to give it a sort of whitewashed look. I applied Distress Oxide Picket Fences ink to wash it out a little more. I used a die to cut the word hello from Kraft paper and then glued it down. Foam tape as the adhesive popped the jar up a bit and gives it a little dimension.  Now I have a simple and cute card ready to be used. 

Tomorrow I’ll be using a newer stamp and another old favorite on something other than a card so come by and check it out. Thanks for looking at my card today and be sure to comment for a chance to win a grab bag of Unity stamps at the end of the week!

Crafting makes everything better…even Mondays!

How I Got Into Making Cards

I have always loved to create. From the time I was a little girl, I’ve always had some creative hobby. Usually more than one at a time. But, for the last several years, I’ve had one hobby that has consumed me and every spare minute I can manufacture.

I fell into the rabbit hole of card making about three years ago. I attended a scrapbook retreat and participated in something called a shoebox card swap.  Even though I wasn’t a card maker and hadn’t planned to be a part of it, all of the people participating had made extra card kits so I was invited to play along.  To be honest, I really just did it because the cards were all so pretty and I was going to walk out of there with a bunch of cards that looked great and were easy to put together. It was not something I intended to ever do again after the retreat because I had tried stamping years ago and didn’t really enjoy it. Mostly because it was very frustrating to me and I wasn’t good at it. I could never get a clear image stamped. It was virtually impossible to get enough ink on a stamp to where I could only stamp it once and it be good enough to use. I would then have to re-stamp it and to be able to line it up perfectly a second time…well, it just wouldn’t happen for me.  But this time, there was something new in the mix. It’s called a MISTI.

The MISTI is a stamping platform that allows you to position your stamp and paper so that you can stamp the image over and over until you’ve gotten the complete image you want. Complete and total game changer for someone like me that had always struggled with this issue! It didn’t take me long to know that I had found a new craft and I was in trouble. LOL I jumped in with both feet and started to swim like crazy.

Card making has released a creativity in me that I honestly didn’t know I had. It has made me so much more aware of color and composition and how to create and balance them. It has led me to try things I never had the confidence to try before.  Watercolors, ink blending, art journaling, mixed media…these are just a few of the things I’ve discovered in the last few years. 

One of the biggest things it’s done for me, confidence wise, is being willing to share what I make. I actually send the cards I make to people! And I will share them on social media and in card making groups where some of the people there are AMAZING artists. But, one of the things I’ve also discovered about this community is that everyone is so encouraging and helpful. No matter how bad what you’ve made is, they are right there to give you advice on how to improve it and words to encourage and uplift you without being critical. There is always someone there to answer your questions and never make you feel stupid for asking something that has been asked a dozen times.

I will say this…it makes me happy and relaxes me to get in my little closet and play with stamps and ink, paper and markers, and paints and brushes. I make things I like. I make things that make me happy and, hopefully, when they land in someone else’s hands, make them smile. My goal is, and always will be, to bring a little sunshine to someone’s mail box.  Learning some art skills and discovering new techniques and mediums along the way is a bonus.  

This week, starting Monday, I will be really stepping out of my comfort zone by being a Growing In Unity (GIU) girl. Unity Stamp Company is one of my absolute favorite stamp companies. They have a wonderful program where you put your name in and they randomly draw out names-one for every week of the year-and then invite those drawn to showcase your creations for a week.  I entered last year and was so excited to have my name drawn. My week is next week-August 10-15. I’m so excited but also nervous. I know I’ve come a long way since I first started making cards but I’m no where near where I want to be.  I feel that it is truly an honor to be a GIU girl and I hope I can do their stamps justice. So, if you’re interested in seeing some awesome stamps or what I’ve made with them, check in every day this week and have a look! 

The desire to create is one of the deepest yearnings of the human soul.  Elder Uchtdorf